How to visualize a range image
This tutorial demonstrates how to visualize a range image with two different means. As a point cloud (since RangeImage is derived from PointCloud) in a 3D viewer and as a picture visualizing the range values as colors.
The code
First, create a file called, let’s say, range_image_visualization.cpp in your favorite
editor, and place the following code inside it:
1 2 3 4 5 6 7 8 9 10 11 12 13 14 15 16 17 18 19 20 21 22 23 24 25 26 27 28 29 30 31 32 33 34 35 36 37 38 39 40 41 42 43 44 45 46 47 48 49 50 51 52 53 54 55 56 57 58 59 60 61 62 63 64 65 66 67 68 69 70 71 72 73 74 75 76 77 78 79 80 81 82 83 84 85 86 87 88 89 90 91 92 93 94 95 96 97 98 99 100 101 102 103 104 105 106 107 108 109 110 111 112 113 114 115 116 117 118 119 120 121 122 123 124 125 126 127 128 129 130 131 132 133 134 135 136 137 138 139 140 141 142 143 144 145 146 147 148 149 150 151 152 153 154 155 156 157 158 159 160 161 162 163 164 165 | #include <iostream>
#include <pcl/common/common_headers.h>
#include <pcl/range_image/range_image.h>
#include <pcl/io/pcd_io.h>
#include <pcl/visualization/range_image_visualizer.h>
#include <pcl/visualization/pcl_visualizer.h>
#include <pcl/console/parse.h>
typedef pcl::PointXYZ PointType;
// --------------------
// -----Parameters-----
// --------------------
float angular_resolution_x = 0.5f,
angular_resolution_y = angular_resolution_x;
pcl::RangeImage::CoordinateFrame coordinate_frame = pcl::RangeImage::CAMERA_FRAME;
bool live_update = false;
// --------------
// -----Help-----
// --------------
void
printUsage (const char* progName)
{
std::cout << "\n\nUsage: "<<progName<<" [options] <scene.pcd>\n\n"
<< "Options:\n"
<< "-------------------------------------------\n"
<< "-rx <float> angular resolution in degrees (default "<<angular_resolution_x<<")\n"
<< "-ry <float> angular resolution in degrees (default "<<angular_resolution_y<<")\n"
<< "-c <int> coordinate frame (default "<< (int)coordinate_frame<<")\n"
<< "-l live update - update the range image according to the selected view in the 3D viewer.\n"
<< "-h this help\n"
<< "\n\n";
}
void
setViewerPose (pcl::visualization::PCLVisualizer& viewer, const Eigen::Affine3f& viewer_pose)
{
Eigen::Vector3f pos_vector = viewer_pose * Eigen::Vector3f(0, 0, 0);
Eigen::Vector3f look_at_vector = viewer_pose.rotation () * Eigen::Vector3f(0, 0, 1) + pos_vector;
Eigen::Vector3f up_vector = viewer_pose.rotation () * Eigen::Vector3f(0, -1, 0);
viewer.setCameraPosition (pos_vector[0], pos_vector[1], pos_vector[2],
look_at_vector[0], look_at_vector[1], look_at_vector[2],
up_vector[0], up_vector[1], up_vector[2]);
}
// --------------
// -----Main-----
// --------------
int
main (int argc, char** argv)
{
// --------------------------------------
// -----Parse Command Line Arguments-----
// --------------------------------------
if (pcl::console::find_argument (argc, argv, "-h") >= 0)
{
printUsage (argv[0]);
return 0;
}
if (pcl::console::find_argument (argc, argv, "-l") >= 0)
{
live_update = true;
std::cout << "Live update is on.\n";
}
if (pcl::console::parse (argc, argv, "-rx", angular_resolution_x) >= 0)
std::cout << "Setting angular resolution in x-direction to "<<angular_resolution_x<<"deg.\n";
if (pcl::console::parse (argc, argv, "-ry", angular_resolution_y) >= 0)
std::cout << "Setting angular resolution in y-direction to "<<angular_resolution_y<<"deg.\n";
int tmp_coordinate_frame;
if (pcl::console::parse (argc, argv, "-c", tmp_coordinate_frame) >= 0)
{
coordinate_frame = pcl::RangeImage::CoordinateFrame (tmp_coordinate_frame);
std::cout << "Using coordinate frame "<< (int)coordinate_frame<<".\n";
}
angular_resolution_x = pcl::deg2rad (angular_resolution_x);
angular_resolution_y = pcl::deg2rad (angular_resolution_y);
// ------------------------------------------------------------------
// -----Read pcd file or create example point cloud if not given-----
// ------------------------------------------------------------------
pcl::PointCloud<PointType>::Ptr point_cloud_ptr (new pcl::PointCloud<PointType>);
pcl::PointCloud<PointType>& point_cloud = *point_cloud_ptr;
Eigen::Affine3f scene_sensor_pose (Eigen::Affine3f::Identity ());
std::vector<int> pcd_filename_indices = pcl::console::parse_file_extension_argument (argc, argv, "pcd");
if (!pcd_filename_indices.empty ())
{
std::string filename = argv[pcd_filename_indices[0]];
if (pcl::io::loadPCDFile (filename, point_cloud) == -1)
{
std::cout << "Was not able to open file \""<<filename<<"\".\n";
printUsage (argv[0]);
return 0;
}
scene_sensor_pose = Eigen::Affine3f (Eigen::Translation3f (point_cloud.sensor_origin_[0],
point_cloud.sensor_origin_[1],
point_cloud.sensor_origin_[2])) *
Eigen::Affine3f (point_cloud.sensor_orientation_);
}
else
{
std::cout << "\nNo *.pcd file given => Generating example point cloud.\n\n";
for (float x=-0.5f; x<=0.5f; x+=0.01f)
{
for (float y=-0.5f; y<=0.5f; y+=0.01f)
{
PointType point; point.x = x; point.y = y; point.z = 2.0f - y;
point_cloud.points.push_back (point);
}
}
point_cloud.width = point_cloud.size (); point_cloud.height = 1;
}
// -----------------------------------------------
// -----Create RangeImage from the PointCloud-----
// -----------------------------------------------
float noise_level = 0.0;
float min_range = 0.0f;
int border_size = 1;
pcl::RangeImage::Ptr range_image_ptr(new pcl::RangeImage);
pcl::RangeImage& range_image = *range_image_ptr;
range_image.createFromPointCloud (point_cloud, angular_resolution_x, angular_resolution_y,
pcl::deg2rad (360.0f), pcl::deg2rad (180.0f),
scene_sensor_pose, coordinate_frame, noise_level, min_range, border_size);
// --------------------------------------------
// -----Open 3D viewer and add point cloud-----
// --------------------------------------------
pcl::visualization::PCLVisualizer viewer ("3D Viewer");
viewer.setBackgroundColor (1, 1, 1);
pcl::visualization::PointCloudColorHandlerCustom<pcl::PointWithRange> range_image_color_handler (range_image_ptr, 0, 0, 0);
viewer.addPointCloud (range_image_ptr, range_image_color_handler, "range image");
viewer.setPointCloudRenderingProperties (pcl::visualization::PCL_VISUALIZER_POINT_SIZE, 1, "range image");
//viewer.addCoordinateSystem (1.0f, "global");
//PointCloudColorHandlerCustom<PointType> point_cloud_color_handler (point_cloud_ptr, 150, 150, 150);
//viewer.addPointCloud (point_cloud_ptr, point_cloud_color_handler, "original point cloud");
viewer.initCameraParameters ();
setViewerPose(viewer, range_image.getTransformationToWorldSystem ());
// --------------------------
// -----Show range image-----
// --------------------------
pcl::visualization::RangeImageVisualizer range_image_widget ("Range image");
range_image_widget.showRangeImage (range_image);
//--------------------
// -----Main loop-----
//--------------------
while (!viewer.wasStopped ())
{
range_image_widget.spinOnce ();
viewer.spinOnce ();
pcl_sleep (0.01);
if (live_update)
{
scene_sensor_pose = viewer.getViewerPose();
range_image.createFromPointCloud (point_cloud, angular_resolution_x, angular_resolution_y,
pcl::deg2rad (360.0f), pcl::deg2rad (180.0f),
scene_sensor_pose, pcl::RangeImage::LASER_FRAME, noise_level, min_range, border_size);
range_image_widget.showRangeImage (range_image);
}
}
}
|
Explanation
In the beginning we do command line parsing, read a point cloud from disc (or create it if not provided) and create a range image. All of these steps are already covered in the ‘How to create a range image from a point cloud’ tutorial.
The interesting part begins here:
...
pcl::visualization::PCLVisualizer viewer ("3D Viewer");
viewer.setBackgroundColor (1, 1, 1);
pcl::visualization::PointCloudColorHandlerCustom<pcl::PointWithRange> range_image_color_handler (range_image_ptr, 0, 0, 0);
viewer.addPointCloud (range_image_ptr, range_image_color_handler, "range image");
viewer.setPointCloudRenderingProperties (pcl::visualization::PCL_VISUALIZER_POINT_SIZE, 1, "range image");
//viewer.addCoordinateSystem (1.0f);
//pcl::visualization::PointCloudColorHandlerCustom<PointType> point_cloud_color_handler (point_cloud_ptr, 150, 150, 150);
//viewer.addPointCloud (point_cloud_ptr, point_cloud_color_handler, "original point cloud");
viewer.initCameraParameters ();
setViewerPose(viewer, range_image.getTransformationToWorldSystem ());
...
This creates the 3D viewer object, sets the background color to white, adds the range image (as a point cloud) with color black and point size 1 and sets the viewing position in the viewer to the sensor position from the range image (using a function defined above the main). The commented part can be used to add a coordinate system and also visualize the original point cloud.
The next part visualizes the range image in 2D, using color coding for the range values:
...
pcl::visualization::RangeImageVisualizer range_image_widget ("Range image");
range_image_widget.setRangeImage (range_image);
...
Now we can start the main loop to keep the visualization alive, until the viewer window is closed:
...
while (!viewer.wasStopped ())
{
  range_image_widget.spinOnce ();
  viewer.spinOnce ();
  pcl_sleep (0.01);
...
range_image_widget.spinOnce() handles the current events of the RangeImageVisualizer and viewer.spinOnce() does the same for the 3D viewer.
Additionally there is the possibility to always update the 2D range image to correspond to the current percpective in the viewer window, which is activated using the command line parameter -l:
...
  if (live_update)
  {
    scene_sensor_pose = viewer.getViewerPose();
    range_image.createFromPointCloud (point_cloud, angular_resolution, pcl::deg2rad (360.0f), pcl::deg2rad (180.0f),
                                      scene_sensor_pose, pcl::RangeImage::LASER_FRAME, noise_level, min_range, border_size);
    range_image_widget.setRangeImage (range_image);
  }
}
...
Here we first get the current viewing position from the viewer window and then recreate the range image.
Compiling and running the program
Add the following lines to your CMakeLists.txt file:
1 2 3 4 5 6 7 8 9 10 11 12 | cmake_minimum_required(VERSION 2.6 FATAL_ERROR)
project(range_image_visualization)
find_package(PCL 1.3 REQUIRED)
include_directories(${PCL_INCLUDE_DIRS})
link_directories(${PCL_LIBRARY_DIRS})
add_definitions(${PCL_DEFINITIONS})
add_executable (range_image_visualization range_image_visualization.cpp)
target_link_libraries (range_image_visualization ${PCL_LIBRARIES})
|
After you have made the executable, you can run it. Simply do:
$ ./range_image_visualization
This will use an autogenerated point cloud of a rectangle floating in space. It opens two windows, one a 3D viewer of the point cloud and one a visual version of the range image, where the range values are color coded.
You can also try it with a point cloud file from your hard drive:
$ ./range_image_visualization <point_cloud.pcd>
You can also try the -l parameter to update the range image according to the current perspective in the viewer:
$ ./range_image_visualization -l <point_cloud.pcd>
The output should look similar to this:
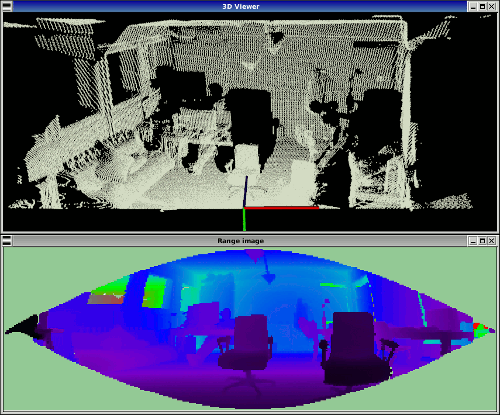
Unseen areas (range -INFINITY) are shown in pale green and far ranges (range INFINITY - if available in the scan) in pale blue.